
- AQS 万字图文全面解析.md.html
- Docker 镜像构建原理及源码分析.md.html
- ElasticSearch 小白从入门到精通.md.html
- JVM CPU Profiler技术原理及源码深度解析.md.html
- JVM 垃圾收集器.md.html
- JVM 面试的 30 个知识点.md.html
- Java IO 体系、线程模型大总结.md.html
- Java NIO浅析.md.html
- Java 面试题集锦(网络篇).md.html
- Java-直接内存 DirectMemory 详解.md.html
- Java中9种常见的CMS GC问题分析与解决(上).md.html
- Java中9种常见的CMS GC问题分析与解决(下).md.html
- Java中的SPI.md.html
- Java中的ThreadLocal.md.html
- Java线程池实现原理及其在美团业务中的实践.md.html
- Java魔法类:Unsafe应用解析.md.html
- Kafka 源码阅读笔记.md.html
- Kafka、ActiveMQ、RabbitMQ、RocketMQ 区别以及高可用原理.md.html
- MySQL · 引擎特性 · InnoDB Buffer Pool.md.html
- MySQL · 引擎特性 · InnoDB IO子系统.md.html
- MySQL · 引擎特性 · InnoDB 事务系统.md.html
- MySQL · 引擎特性 · InnoDB 同步机制.md.html
- MySQL · 引擎特性 · InnoDB 数据页解析.md.html
- MySQL · 引擎特性 · InnoDB崩溃恢复.md.html
- MySQL · 引擎特性 · 临时表那些事儿.md.html
- MySQL 主从复制 半同步复制.md.html
- MySQL 主从复制 基于GTID复制.md.html
- MySQL 主从复制.md.html
- MySQL 事务日志(redo log和undo log).md.html
- MySQL 亿级别数据迁移实战代码分享.md.html
- MySQL 从一条数据说起-InnoDB行存储数据结构.md.html
- MySQL 地基基础:事务和锁的面纱.md.html
- MySQL 地基基础:数据字典.md.html
- MySQL 地基基础:数据库字符集.md.html
- MySQL 性能优化:碎片整理.md.html
- MySQL 故障诊断:一个 ALTER TALBE 执行了很久,你慌不慌?.md.html
- MySQL 故障诊断:如何在日志中轻松定位大事务.md.html
- MySQL 故障诊断:教你快速定位加锁的 SQL.md.html
- MySQL 日志详解.md.html
- MySQL 的半同步是什么?.md.html
- MySQL中的事务和MVCC.md.html
- MySQL事务_事务隔离级别详解.md.html
- MySQL优化:优化 select count().md.html
- MySQL共享锁、排他锁、悲观锁、乐观锁.md.html
- MySQL的MVCC(多版本并发控制).md.html
- QingStor 对象存储架构设计及最佳实践.md.html
- RocketMQ 面试题集锦.md.html
- SnowFlake 雪花算法生成分布式 ID.md.html
- Spring Boot 2.x 结合 k8s 实现分布式微服务架构.md.html
- Spring Boot 教程:如何开发一个 starter.md.html
- Spring MVC 原理.md.html
- Spring MyBatis和Spring整合的奥秘.md.html
- Spring 帮助你更好的理解Spring循环依赖.md.html
- Spring 循环依赖及解决方式.md.html
- Spring中眼花缭乱的BeanDefinition.md.html
- Vert.x 基础入门.md.html
- eBay 的 Elasticsearch 性能调优实践.md.html
- 不可不说的Java“锁”事.md.html
- 互联网并发限流实战.md.html
- 从ReentrantLock的实现看AQS的原理及应用.md.html
- 从SpringCloud开始,聊微服务架构.md.html
- 全面了解 JDK 线程池实现原理.md.html
- 分布式一致性理论与算法.md.html
- 分布式一致性算法 Raft.md.html
- 分布式唯一 ID 解析.md.html
- 分布式链路追踪:集群管理设计.md.html
- 动态代理种类及原理,你知道多少?.md.html
- 响应式架构与 RxJava 在有赞零售的实践.md.html
- 大数据算法——布隆过滤器.md.html
- 如何优雅地记录操作日志?.md.html
- 如何设计一个亿级消息量的 IM 系统.md.html
- 异步网络模型.md.html
- 当我们在讨论CQRS时,我们在讨论些神马?.md.html
- 彻底理解 MySQL 的索引机制.md.html
- 最全的 116 道 Redis 面试题解答.md.html
- 有赞权限系统(SAM).md.html
- 有赞零售中台建设方法的探索与实践.md.html
- 服务注册与发现原理剖析(Eureka、Zookeeper、Nacos).md.html
- 深入浅出Cache.md.html
- 深入理解 MySQL 底层实现.md.html
- 漫画讲解 git rebase VS git merge.md.html
- 生成浏览器唯一稳定 ID 的探索.md.html
- 缓存 如何保证缓存与数据库的双写一致性?.md.html
- 网易严选怎么做全链路监控的?.md.html
- 美团万亿级 KV 存储架构与实践.md.html
- 美团点评Kubernetes集群管理实践.md.html
- 美团百亿规模API网关服务Shepherd的设计与实现.md.html
- 解读《阿里巴巴 Java 开发手册》背后的思考.md.html
- 认识 MySQL 和 Redis 的数据一致性问题.md.html
- 进阶:Dockerfile 高阶使用指南及镜像优化.md.html
- 铁总在用的高性能分布式缓存计算框架 Geode.md.html
- 阿里云PolarDB及其共享存储PolarFS技术实现分析(上).md.html
- 阿里云PolarDB及其共享存储PolarFS技术实现分析(下).md.html
- 面试最常被问的 Java 后端题.md.html
- 领域驱动设计在互联网业务开发中的实践.md.html
- 领域驱动设计的菱形对称架构.md.html
- 高效构建 Docker 镜像的最佳实践.md.html
Spring MVC 原理
-
前言
随着 Spring Boot 逐步全面覆盖到我们的项目之中,我们已经基本忘却当年经典的 Servlet + Spring MVC 的组合,那让人熟悉的 web.xml 配置。而本文,我们想先抛开 Spring Boot 到一旁,回到从前,一起来看看 Servlet 是怎么和 Spring MVC 集成,怎么来初始化 Spring 容器的。
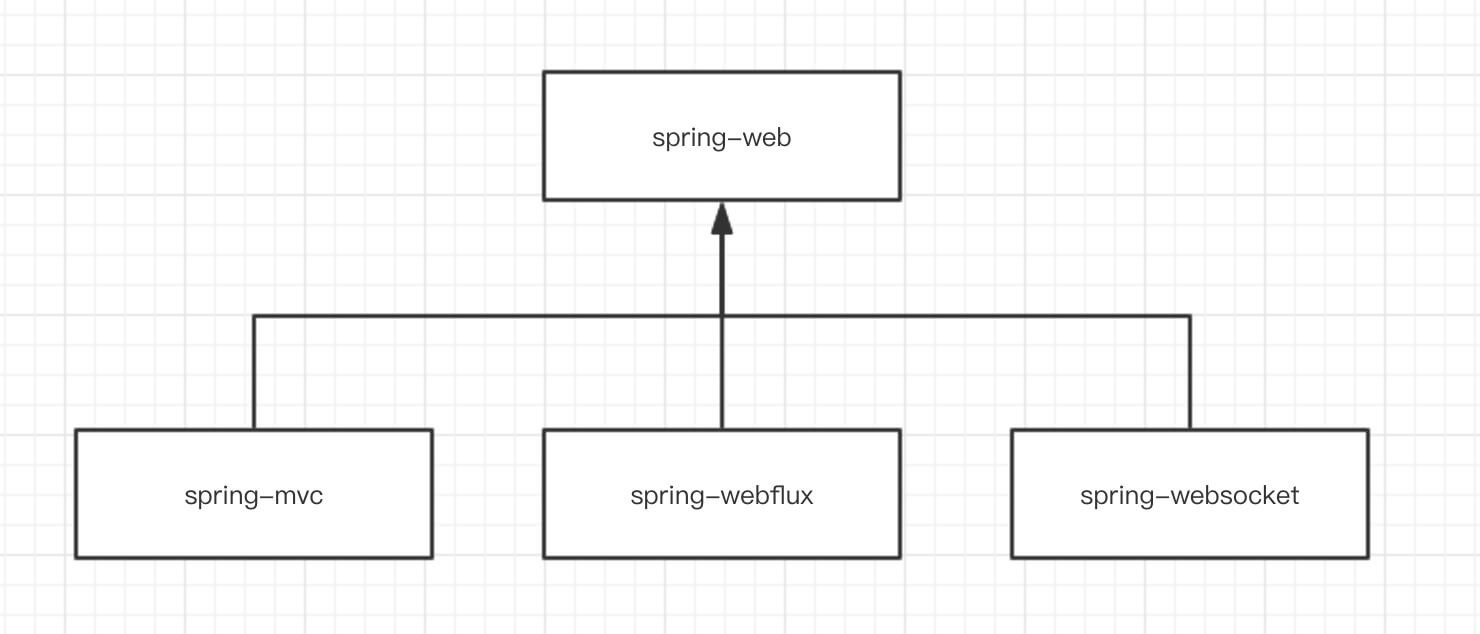
在看源码之前我们先看下 Spring MVC 在 Spring 中的架构依赖,它不是一个单独的项目,它有依赖的爸爸 spring-web 项目,也有两个兄弟 spring-webflux 和 spring-websocket 项目,本文只讲 Spring MVC,Spring Webflux 和 Spring WebSocket 日后会更新 Chat。
一、上下文在 Web 容器中的启动
1.1 Tomcat 中的应用部署描述文件 web.xml
以 Tomcat 作为 Web 容器为例进行分析。在 Tomcat 中,web.xml 是应用的部署描述文件。
<!-- [1] Spring 配置 -->
<listener>
    <listener-class>org.springframework.web.context.ContextLoaderListener</listener-class>
</listener>
<!-- 指定 Spring IOC 容器读取 bean 定义的 XML 文件的路径,默认配置在 WEB-INF 目录下 -->
<context-param>
    <param-name>contextConfigLocation</param-name>
    <param-value>classpath:config/applicationContext.xml</param-value>
</context-param>
<!-- [2] Spring MVC 配置 -->
<servlet>
    <servlet-name>spring</servlet-name>
    <servlet-class>org.springframework.web.servlet.DispatcherServlet</servlet-class>
        <!-- 可以自定义servlet.xml配置文件的位置和名称,默认为WEB-INF目录下,名称为[<servlet-name>]-servlet.xml,如spring-servlet.xml-->
        <init-param>
            <param-name>contextConfigLocation</param-name>
            <param-value>/WEB-INF/spring-servlet.xml</param-value> // 默认
        </init-param>
    <load-on-startup>1</load-on-startup>
</servlet>
<servlet-mapping>
    <servlet-name>spring</servlet-name>
    <url-pattern>*.do</url-pattern>
</servlet-mapping>
[1] 处,配置了 org.springframework.web.context.ContextLoaderListener 对象。这是一个 javax.servlet.ServletContextListener 对象,会初始化一个 Root Spring WebApplicationContext 容器。
[2] 处,配置了 org.springframework.web.servlet.DispatcherServlet 对象。这是一个 javax.servlet.http.HttpServlet 对象,它除了拦截我们制定的 *.do 请求外,也会初始化一个属于它的 Spring WebApplicationContext 容器。并且,这个容器是以 [1] 处的 Root 容器作为父容器。
在 Servlet 容器启动时,例如 Tomcat、Jetty 启动,则会被 ContextLoaderListener 监听到,从而调用 ContextLoaderListener #contextInitialized(ServletContextEvent event) 方法,初始化 Root WebApplicationContext 容器。
1.2 IOC 容器启动的基本过程
先看下 ContextLoaderListener 的类图:
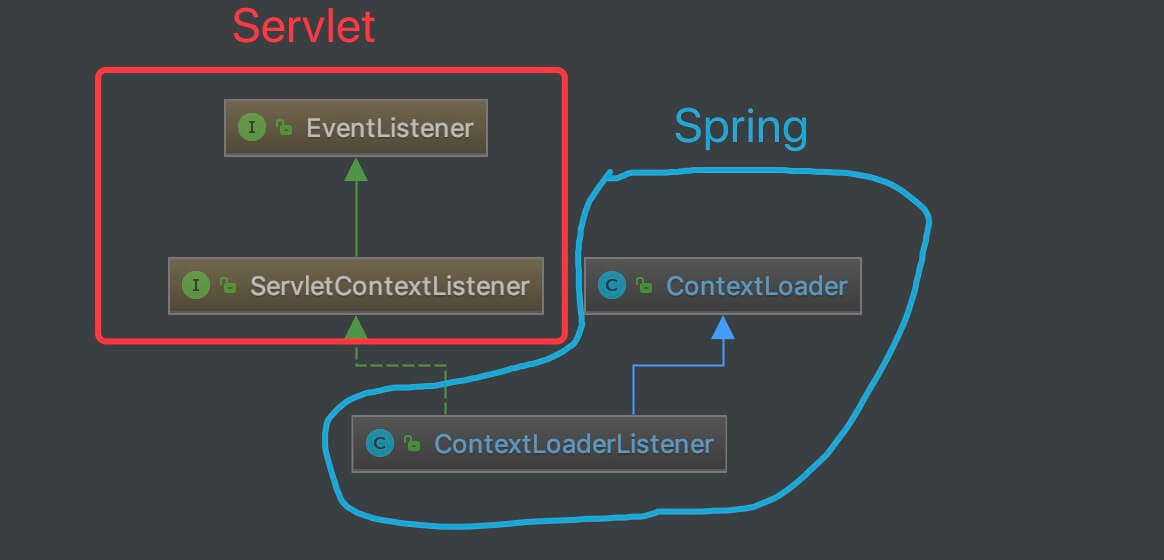
org.springframework.web.context.ContextLoaderListener,实现 ServletContextListener 接口,继承 ContextLoader 类,实现 Servlet 容器启动和关闭时,分别初始化和销毁 WebApplicationContext 容器。(注意,这个 ContextLoaderListener 类,是在 spring-web 项目中。)
ContextLoaderListener 初始化 Root WebApplicationContext 的入口在 ContextLoaderListener#contextInitialized() 方法中,代码如下:
// ContextLoaderListener.java
@Override
public void contextInitialized(ServletContextEvent event) {
    // 初始化 Root WebApplicationContext
    initWebApplicationContext(event.getServletContext());
}
跟进到 ContextLoader#initWebApplicationContext() 方法,代码如下:
// ContextLoader.java // 当前 web 容器 private static volatile WebApplicationContext currentContext; // 线程上下文类加载器到当前 web 容器的映射 private static final Map<ClassLoader, WebApplicationContext> currentContextPerThread = new ConcurrentHashMap<ClassLoader, WebApplicationContext>(1); public WebApplicationContext initWebApplicationContext(ServletContext servletContext) { // <1> 若已经存在 ROOT_WEB_APPLICATION_CONTEXT_ATTRIBUTE 对应的 WebApplicationContext 对象,则抛出 IllegalStateException 异常。 // 例如,在 web.xml 中存在多个 ContextLoader。 if (servletContext.getAttribute(WebApplicationContext.ROOT_WEB_APPLICATION_CONTEXT_ATTRIBUTE) != null) { throw new IllegalStateException( "Cannot initialize context because there is already a root application context present - " + "check whether you have multiple ContextLoader* definitions in your web.xml!"); } // <2> 打印日志 servletContext.log("Initializing Spring root WebApplicationContext"); Log logger = LogFactory.getLog(ContextLoader.class); if (logger.isInfoEnabled()) { logger.info("Root WebApplicationContext: initialization started"); } // 记录开始时间 long startTime = System.currentTimeMillis(); try { // Store context in local instance variable, to guarantee that // it is available on ServletContext shutdown. if (this.context == null) { // <3> 初始化 context,即创建 context 对象 this.context = createWebApplicationContext(servletContext); } // <4> 如果是 ConfigurableWebApplicationContext 的子类,如果未刷新,则进行配置和刷新 if (this.context instanceof ConfigurableWebApplicationContext) { ConfigurableWebApplicationContext cwac = (ConfigurableWebApplicationContext) this.context; if (!cwac.isActive()) { // <4.1> 未刷新( 激活 ) // The context has not yet been refreshed -> provide services such as // setting the parent context, setting the application context id, etc if (cwac.getParent() == null) { // <4.2> 无父容器,则进行加载和设置。 // The context instance was injected without an explicit parent -> // determine parent for root web application context, if any. ApplicationContext parent = loadParentContext(servletContext); cwac.setParent(parent); } // <4.3> 配置 context 对象,并进行刷新 configureAndRefreshWebApplicationContext(cwac, servletContext); } } // <5> 记录在 servletContext 中 servletContext.setAttribute(WebApplicationContext.ROOT_WEB_APPLICATION_CONTEXT_ATTRIBUTE, this.context); // <6> 记录到 currentContext 或 currentContextPerThread 中 ClassLoader ccl = Thread.currentThread().getContextClassLoader(); if (ccl == ContextLoader.class.getClassLoader()) { currentContext = this.context; } else if (ccl != null) { currentContextPerThread.put(ccl, this.context); } // <7> 打印日志 if (logger.isInfoEnabled()) { long elapsedTime = System.currentTimeMillis() - startTime; logger.info("Root WebApplicationContext initialized in " + elapsedTime + " ms"); } // <8> 返回 context return this.context; } catch (RuntimeException | Error ex) { // <9> 当发生异常,记录异常到 WebApplicationContext.ROOT_WEB_APPLICATION_CONTEXT_ATTRIBUTE 中,不再重新初始化。 logger.error("Context initialization failed", ex); servletContext.setAttribute(WebApplicationContext.ROOT_WEB_APPLICATION_CONTEXT_ATTRIBUTE, ex); throw ex; } }- <1> 处,若已经存在 ROOTWEBAPPLICATIONCONTEXTATTRIBUTE 对应的 WebApplicationContext 对象,则抛出 IllegalStateException 异常。例如,在 web.xml 中存在多个 ContextLoader。
- <2> 处,打印日志。
- <3> 处,调用 #createWebApplicationContext(ServletContext sc) 方法,初始化 context,即创建 WebApplicationContext 对象。详细解析,胖友先跳到 「3.2.3 createWebApplicationContext」。
- <4> 处,如果 context 是 ConfigurableWebApplicationContext 的子类,如果未刷新,则进行配置和刷新。
- <4.1> 处,如果未刷新(激活)。默认情况下,是符合这个条件的,所以会往下执行。
- <4.2> 处,无父容器,则进行加载和设置。默认情况下,ContextLoader#loadParentContext(ServletContext servletContext) 方法,返回 null。代码如下:
// ContextLoader.java
@Nullable
protected ApplicationContext loadParentContext(ServletContext servletContext) {
    return null;
}
这是一个让子类实现的方法。当然,子类 ContextLoaderListener 并没有重写该方法。所以,实际上,<4.2> 处的逻辑,可以暂时忽略。
- <4.3> 处,调用
#configureAndRefreshWebApplicationContext(ConfigurableWebApplicationContext
                                            wac, ServletContext sc)
方法,配置 ConfigurableWebApplicationContext 对象,并进行刷新。 - <5> 处,记录 context 在 ServletContext 中。这样,如果 web.xml 如果定义了多个 ContextLoader,就会在 <1> 处报错。
- <6> 处,记录到 currentContext 或 currentContextPerThread 中,差异在于类加载器的不同。
- <7> 处,打印日志。
- <8> 处,返回 context。
- <9> 处,当发生异常,记录异常到 WebApplicationContext.ROOT_WEB_APPLICATION_CONTEXT_ATTRIBUTE 中,不再重新初始化。即对应到 <1> 处的逻辑。
继续跟进到创建 Root WebApplication 的方法,
ContextLoader#createWebApplicationContext()方法,代码如下:// ContextLoader.java protected WebApplicationContext createWebApplicationContext(ServletContext sc) { // <1> 获得 context 的类 Class<?> contextClass = determineContextClass(sc); // <2> 判断 context 的类,是否符合 ConfigurableWebApplicationContext 的类型 if (!ConfigurableWebApplicationContext.class.isAssignableFrom(contextClass)) { throw new ApplicationContextException("Custom context class [" + contextClass.getName() + "] is not of type [" + ConfigurableWebApplicationContext.class.getName() + "]"); } // <3> 创建 context 的类的对象 return (ConfigurableWebApplicationContext) BeanUtils.instantiateClass(contextClass); }<1> 处,调用 ContextLoader#determineContextClass(ServletContext servletContext) 方法,获得 context 的类。代码如下:
// ContextLoader.java
/**
 * Config param for the root WebApplicationContext implementation class to use: {@value}.
 * @see #determineContextClass(ServletContext)
 */
public static final String CONTEXT_CLASS_PARAM = "contextClass";
protected Class<?> determineContextClass(ServletContext servletContext) {
    // 获得参数 contextClass 的值
    String contextClassName = servletContext.getInitParameter(CONTEXT_CLASS_PARAM);
    // 情况一,如果值非空,则获得该类
    if (contextClassName != null) {
        try {
            return ClassUtils.forName(contextClassName, ClassUtils.getDefaultClassLoader());
        } catch (ClassNotFoundException ex) {
            throw new ApplicationContextException(
                    "Failed to load custom context class [" + contextClassName + "]", ex);
        }
    // 情况二,从 defaultStrategies 获得该类
    } else {
        contextClassName = defaultStrategies.getProperty(WebApplicationContext.class.getName());
        try {
            return ClassUtils.forName(contextClassName, ContextLoader.class.getClassLoader());
        } catch (ClassNotFoundException ex) {
            throw new ApplicationContextException(
                    "Failed to load default context class [" + contextClassName + "]", ex);
        }
    }
}
分成两种情况。前者,从 ServletContext 配置的 context 类;后者,从 ContextLoader.properties 配置的 context 类。
默认情况下,我们不会主动在 ServletContext 配置的 context 类,所以基本是使用 ContextLoader.properties 配置的 context 类,即 XmlWebApplicationContext 类。
<2> 处,判断 context 的类,是否符合 ConfigurableWebApplicationContext 的类型。显然,XmlWebApplicationContext 是符合条件的,所以不会抛出 ApplicationContextException 异常。
<3> 处,调用
BeanUtils#instantiateClass(Class<T> clazz)方法,创建 context 的类的对象。继续跟进到刷新 Root WebApplicationContext 容器的方法,
ContextLoader#configureAndRefreshWebApplicationContext()方法,代码如下:// ContextLoader.java /** * Config param for the root WebApplicationContext id, * to be used as serialization id for the underlying BeanFactory: {@value}. */ public static final String CONTEXT_ID_PARAM = "contextId"; /** * Name of servlet context parameter (i.e., {@value}) that can specify the * config location for the root context, falling back to the implementation's * default otherwise. * @see org.springframework.web.context.support.XmlWebApplicationContext#DEFAULT_CONFIG_LOCATION */ public static final String CONFIG_LOCATION_PARAM = "contextConfigLocation"; public static final String CONTEXT_ID_PARAM = "contextId"; protected void configureAndRefreshWebApplicationContext(ConfigurableWebApplicationContext wac, ServletContext sc) { // <1> 如果 wac 使用了默认编号,则重新设置 id 属性 if (ObjectUtils.identityToString(wac).equals(wac.getId())) { // The application context id is still set to its original default value // -> assign a more useful id based on available information // 情况一,使用 contextId 属性 String idParam = sc.getInitParameter(CONTEXT_ID_PARAM); if (idParam != null) { wac.setId(idParam); // 情况二,自动生成 } else { // Generate default id... wac.setId(ConfigurableWebApplicationContext.APPLICATION_CONTEXT_ID_PREFIX + ObjectUtils.getDisplayString(sc.getContextPath())); } } // <2>设置 context 的 ServletContext 属性 wac.setServletContext(sc); // <3> 设置 context 的配置文件地址 String configLocationParam = sc.getInitParameter(CONFIG_LOCATION_PARAM); if (configLocationParam != null) { wac.setConfigLocation(configLocationParam); } ConfigurableEnvironment env = wac.getEnvironment(); if (env instanceof ConfigurableWebEnvironment) { ((ConfigurableWebEnvironment) env).initPropertySources(sc, null); } // <4> 执行自定义初始化 context customizeContext(sc, wac); // <5> 刷新 context,执行初始化 wac.refresh(); }此处,注释上即写了 wac,右写了 context,实际上,是等价的东西。下面的文字,我们统一用 wac。
<1> 处,如果 wac 使用了默认编号,则重新设置 id 属性。默认情况下,我们不会对 wac 设置编号,所以会执行进去。而实际上,id 的生成规则,也分成使用 contextId 在
标签中设置,和自动生成两种情况。默认情况下,会走第二种情况。 <2> 处,设置 wac 的 ServletContext 属性。
【关键】<3> 处,设置 context 的配置文件地址。例如我们在 「1. 概述」 中所看到的。
<context-param>
    <param-name>contextConfigLocation</param-name>
    <param-value>classpath:config/applicationContext.xml</param-value>
</context-param>
<4> 处,调用 #customizeContext(ServletContext sc, ConfigurableWebApplicationContext wac) 方法,执行自定义初始化 wac。 【关键】<5> 处, 刷新 wac,执行初始化。此处,就会进行一些的 Spring 容器的初始化。
二、DispatcherServlet 的启动和初始化
回过头来看一眼 web.xml 的配置。代码如下:
<servlet>
    <servlet-name>spring</servlet-name>
    <servlet-class>org.springframework.web.servlet.DispatcherServlet</servlet-class>
    <!-- 可以自定义servlet.xml配置文件的位置和名称,默认为WEB-INF目录下,名称为[<servlet-name>]-servlet.xml,如spring-servlet.xml-->
        <init-param>
            <param-name>contextConfigLocation</param-name>
            <param-value>/WEB-INF/spring-servlet.xml</param-value> // 默认
        </init-param>
    <load-on-startup>1</load-on-startup>
</servlet>
<servlet-mapping>
    <servlet-name>spring</servlet-name>
    <url-pattern>*.do</url-pattern>
</servlet-mapping>
即, Servlet WebApplicationContext 容器的初始化,是在 DispatcherServlet 初始化的过程中执行。
DispatcherServlet 的类图如下:
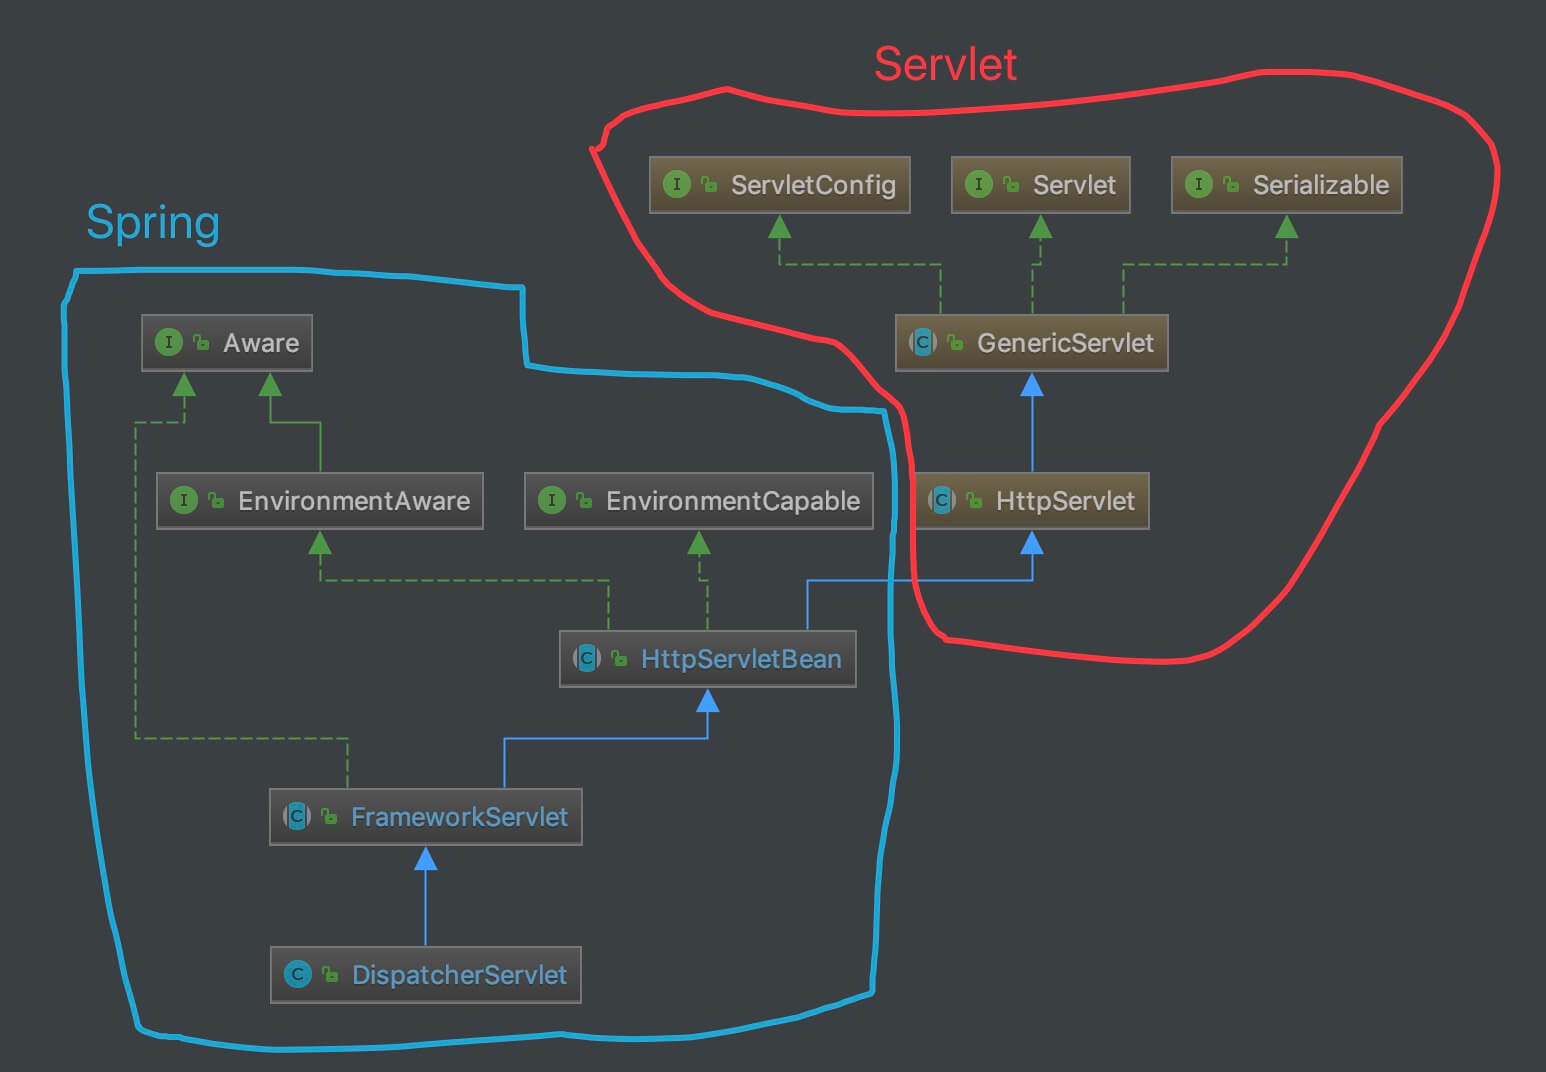
- HttpServletBean,负责将 ServletConfig 设置到当前 Servlet 对象中。
- FrameworkServlet,负责初始化 Spring Servlet——WebApplicationContext 容器。
- DispatcherServlet,负责初始化 Spring MVC 的各个组件,以及处理客户端的请求。
每一层的 Servlet 实现类,执行对应负责的逻辑,下面我们逐个类来进行解析。
2.1 HttpServletBean
HttpServletBean#init() 方法负责将 ServletConfig 设置到当前 Servlet 对象中。代码如下:
// HttpServletBean.java
@Override
public final void init() throws ServletException {
    // Set bean properties from init parameters.
    // <1> 解析 <init-param /> 标签,封装到 PropertyValues pvs 中
    PropertyValues pvs = new ServletConfigPropertyValues(getServletConfig(), this.requiredProperties);
    if (!pvs.isEmpty()) {
        try {
            // <2.1> 将当前的这个 Servlet 对象,转化成一个 BeanWrapper 对象。从而能够以 Spring 的方式来将 pvs 注入到该 BeanWrapper 对象中
            BeanWrapper bw = PropertyAccessorFactory.forBeanPropertyAccess(this);
            ResourceLoader resourceLoader = new ServletContextResourceLoader(getServletContext());
            // <2.2> 注册自定义属性编辑器,一旦碰到 Resource 类型的属性,将会使用 ResourceEditor 进行解析
            bw.registerCustomEditor(Resource.class, new ResourceEditor(resourceLoader, getEnvironment()));
            // <2.3> 空实现,留给子类覆盖
            initBeanWrapper(bw);
            // <2.4> 以 Spring 的方式来将 pvs 注入到该 BeanWrapper 对象中
            bw.setPropertyValues(pvs, true);
        } catch (BeansException ex) {
            if (logger.isErrorEnabled()) {
                logger.error("Failed to set bean properties on servlet '" + getServletName() + "'", ex);
            }
            throw ex;
        }
    }
    // Let subclasses do whatever initialization they like.
    // <3> 子类来实现,实现自定义的初始化逻辑。目前,有具体的代码实现。
    initServletBean();
}
<1> 处,解析 Servlet 配置的
标签,封装到 PropertyValues pvs 中。其中,ServletConfigPropertyValues 是 HttpServletBean 的私有静态类,继承 MutablePropertyValues 类,ServletConfig 的 PropertyValues 封装实现类。代码如下: 代码简单,实现两方面的逻辑:第一,遍历 ServletConfig 的初始化参数集合,添加到 ServletConfigPropertyValues 中;第二,判断要求的属性是否齐全。如果不齐全,则抛出 ServletException 异常。
// HttpServletBean.java
private static class ServletConfigPropertyValues extends MutablePropertyValues {
    /**
     * Create new ServletConfigPropertyValues.
     * @param config the ServletConfig we'll use to take PropertyValues from
     * @param requiredProperties set of property names we need, where
     * we can't accept default values
     * @throws ServletException if any required properties are missing
     */
    public ServletConfigPropertyValues(ServletConfig config, Set<String> requiredProperties)
            throws ServletException {
        // 获得缺失的属性的集合
        Set<String> missingProps = (!CollectionUtils.isEmpty(requiredProperties) ?
                new HashSet<>(requiredProperties) : null);
        //  遍历 ServletConfig 的初始化参数集合,添加到 ServletConfigPropertyValues 中,并从 missingProps 移除
        Enumeration<String> paramNames = config.getInitParameterNames();
        while (paramNames.hasMoreElements()) {
            String property = paramNames.nextElement();
            Object value = config.getInitParameter(property);
            // 添加到 ServletConfigPropertyValues 中
            addPropertyValue(new PropertyValue(property, value));
            // 从 missingProps 中移除
            if (missingProps != null) {
                missingProps.remove(property);
            }
        }
        // Fail if we are still missing properties.
        // 如果存在缺失的属性,抛出 ServletException 异常
        if (!CollectionUtils.isEmpty(missingProps)) {
            throw new ServletException(
                    "Initialization from ServletConfig for servlet '" + config.getServletName() +
                    "' failed; the following required properties were missing: " +
                    StringUtils.collectionToDelimitedString(missingProps, ", "));
        }
    }
}
<2.1> 处,将当前的这个 Servlet 对象,转化成一个 BeanWrapper 对象。从而能够以 Spring 的方式来将 pvs 注入到该 BeanWrapper 对象中。简单来说,BeanWrapper 是 Spring 提供的一个用来操作 Java Bean 属性的工具,使用它可以直接修改一个对象的属性。
<2.2> 处,注册自定义属性编辑器,一旦碰到 Resource 类型的属性,将会使用 ResourceEditor 进行解析。
<2.3> 处,空实现,留给子类覆盖。代码如下:
// HttpServletBean.java
/**
 * Initialize the BeanWrapper for this HttpServletBean,
 * possibly with custom editors.
 * <p>This default implementation is empty.
 * @param bw the BeanWrapper to initialize
 * @throws BeansException if thrown by BeanWrapper methods
 * @see org.springframework.beans.BeanWrapper#registerCustomEditor
 */
protected void initBeanWrapper(BeanWrapper bw) throws BeansException {
}
然而实际上,子类暂时木有任何实现。
<2.4> 处,以 Spring 的方式来将 pvs 注入到该 BeanWrapper 对象中,即设置到当前 Servlet 对象中。可能比较费解,我们还是举个例子。假设如下:
// web.xml
<servlet>
    <servlet-name>spring</servlet-name>
    <servlet-class>org.springframework.web.servlet.DispatcherServlet</servlet-class>
    <init-param>
        <param-name>contextConfigLocation</param-name>
        <param-value>/WEB-INF/spring-servlet.xml</param-value>
    </init-param>
    <load-on-startup>1</load-on-startup>
</servlet>
<servlet-mapping>
    <servlet-name>spring</servlet-name>
    <url-pattern>*.do</url-pattern>
</servlet-mapping>
此处有配置了 contextConfigLocation 属性,那么通过 <2.4> 处的逻辑,会反射设置到 FrameworkServlet.contextConfigLocation 属性。代码如下:
// FrameworkServlet.java
/** Explicit context config location. */
@Nullable
private String contextConfigLocation;
public void setContextConfigLocation(@Nullable String contextConfigLocation) {
    this.contextConfigLocation = contextConfigLocation;
}
看懂了这波骚操作了么?
<3> 处,调用 #initServletBean() 方法,子类来实现,实现自定义的初始化逻辑。目前,FrameworkServlet 实现类该方法。代码如下:
// HttpServletBean.java
protected void initServletBean() throws ServletException {
}
2.2 FrameworkServlet
org.springframework.web.servlet.FrameworkServlet,实现 ApplicationContextAware 接口,继承 HttpServletBean 抽象类,负责初始化 Spring Servlet WebApplicationContext 容器。同时,FrameworkServlet 自身也是一个抽象类。
跟进到 FrameworkServlet#initServletBean() 方法,进一步初始化当前 Servlet 对象。实际上,重心在初始化 Servlet WebApplicationContext 容器。代码如下:
// FrameworkServlet.java
@Override
protected final void initServletBean() throws ServletException {
    // 打日志
    getServletContext().log("Initializing Spring " + getClass().getSimpleName() + " '" + getServletName() + "'");
    if (logger.isInfoEnabled()) {
        logger.info("Initializing Servlet '" + getServletName() + "'");
    }
    // 记录开始时间
    long startTime = System.currentTimeMillis();
    try {
        // 初始化 WebApplicationContext 对象
        this.webApplicationContext = initWebApplicationContext();
        // 空实现。子类有需要,可以实现该方法,实现自定义逻辑
        initFrameworkServlet();
    } catch (ServletException | RuntimeException ex) {
        logger.error("Context initialization failed", ex);
        throw ex;
    }
    // 打日志
    if (logger.isDebugEnabled()) {
        String value = this.enableLoggingRequestDetails ?
                "shown which may lead to unsafe logging of potentially sensitive data" :
                "masked to prevent unsafe logging of potentially sensitive data";
        logger.debug("enableLoggingRequestDetails='" + this.enableLoggingRequestDetails +
                "': request parameters and headers will be " + value);
    }
    // 打日志
    if (logger.isInfoEnabled()) {
        logger.info("Completed initialization in " + (System.currentTimeMillis() - startTime) + " ms");
    }
}
<1> 处,调用 #initWebApplicationContext() 方法,初始化 Servlet WebApplicationContext 对象。
<2> 处,调用 #initFrameworkServlet() 方法,空实现。子类有需要,可以实现该方法,实现自定义逻辑。代码如下:
// FrameworkServlet.java
/**
 * This method will be invoked after any bean properties have been set and
 * the WebApplicationContext has been loaded. The default implementation is empty;
 * subclasses may override this method to perform any initialization they require.
 * @throws ServletException in case of an initialization exception
 */
protected void initFrameworkServlet() throws ServletException {
}
然而实际上,并没有子类,对该方法重新实现。
继续跟进到 FrameworkServlet#initWebApplicationContext() 方法,初始化 Servlet WebApplicationContext 对象。代码如下: 这个方法的逻辑并不复杂,但是涉及调用的方法的逻辑比较多。同时,也是本文最最最核心的方法了。
// FrameworkServlet.java
protected WebApplicationContext initWebApplicationContext() {
    // <1> 获得 Root WebApplicationContext 对象
    WebApplicationContext rootContext = WebApplicationContextUtils.getWebApplicationContext(getServletContext());
    // <2> 获得 WebApplicationContext wac 变量
    WebApplicationContext wac = null;
    // 第一种情况,如果构造方法已经传入 webApplicationContext 属性,则直接使用
    if (this.webApplicationContext != null) {
        // A context instance was injected at construction time -> use it
        // 赋值给 wac 变量
        wac = this.webApplicationContext;
        // 如果是 ConfigurableWebApplicationContext 类型,并且未激活,则进行初始化
        if (wac instanceof ConfigurableWebApplicationContext) {
            ConfigurableWebApplicationContext cwac = (ConfigurableWebApplicationContext) wac;
            if (!cwac.isActive()) { // 未激活
                // The context has not yet been refreshed -> provide services such as
                // setting the parent context, setting the application context id, etc
                // 设置 wac 的父 context 为 rootContext 对象
                if (cwac.getParent() == null) {
                    // The context instance was injected without an explicit parent -> set
                    // the root application context (if any; may be null) as the parent
                    cwac.setParent(rootContext);
                }
                // 配置和初始化 wac
                configureAndRefreshWebApplicationContext(cwac);
            }
        }
    }
    // 第二种情况,从 ServletContext 获取对应的 WebApplicationContext 对象
    if (wac == null) {
        // No context instance was injected at construction time -> see if one
        // has been registered in the servlet context. If one exists, it is assumed
        // that the parent context (if any) has already been set and that the
        // user has performed any initialization such as setting the context id
        wac = findWebApplicationContext();
    }
    // 第三种,创建一个 WebApplicationContext 对象
    if (wac == null) {
        // No context instance is defined for this servlet -> create a local one
        wac = createWebApplicationContext(rootContext);
    }
    // <3> 如果未触发刷新事件,则主动触发刷新事件
    if (!this.refreshEventReceived) {
        // Either the context is not a ConfigurableApplicationContext with refresh
        // support or the context injected at construction time had already been
        // refreshed -> trigger initial onRefresh manually here.
        onRefresh(wac);
    }
    // <4> 将 context 设置到 ServletContext 中
    if (this.publishContext) {
        // Publish the context as a servlet context attribute.
        String attrName = getServletContextAttributeName();
        getServletContext().setAttribute(attrName, wac);
    }
    return wac;
}
<1> 处,调用 WebApplicationContextUtils#getWebApplicationContext((ServletContext sc) 方法,获得 Root WebApplicationContext 对象。
<2> 处,获得 WebApplicationContext wac 变量。下面,会分成三种情况:第一种情况,如果构造方法已经传入 webApplicationContext 属性,则直接使用、第二种情况,从 ServletContext 获取对应的 WebApplicationContext 对象、第三种,创建一个 WebApplicationContext 对象。
<3> 处,如果未触发刷新事件,则调用 FrameworkServlet#onRefresh(ApplicationContext context) 主动触发刷新事件。另外,refreshEventReceived 属性,定义如下:
/ FrameworkServlet.java
/**
 * Flag used to detect whether onRefresh has already been called.
 *
 * 标记是否接收到 ContextRefreshedEvent 事件。即 {@link #onApplicationEvent(ContextRefreshedEvent)}
 */
private boolean refreshEventReceived = false;
<4> 处,如果 publishContext 为 true 时,则将 context 设置到 ServletContext 中。(
key = FrameworkServlet.class.getName() + ".CONTEXT."、value = wac)继续跟进到 FrameworkServlet#onRefresh() 方法,当 Servlet WebApplicationContext 刷新完成后,会触发 Spring MVC 组件的初始化。代码如下:
// FrameworkServlet.java
/**
 * Template method which can be overridden to add servlet-specific refresh work.
 * Called after successful context refresh.
 * <p>This implementation is empty.
 * @param context the current WebApplicationContext
 * @see #refresh()
 */
protected void onRefresh(ApplicationContext context) {
    // For subclasses: do nothing by default.
}
这是一个空方法,具体的实现,在子类 DispatcherServlet 中。代码如下:
// DispatcherServlet.java
/**
 * This implementation calls {@link #initStrategies}.
 */
@Override
protected void onRefresh(ApplicationContext context) {
    initStrategies(context);
}
/**
 * Initialize the strategy objects that this servlet uses.
 * <p>May be overridden in subclasses in order to initialize further strategy objects.
 */
protected void initStrategies(ApplicationContext context) {
    // 初始化 MultipartResolver
    initMultipartResolver(context);
    // 初始化 LocaleResolver
    initLocaleResolver(context);
    // 初始化 ThemeResolver
    initThemeResolver(context);
    // 初始化 HandlerMappings
    initHandlerMappings(context);
    // 初始化 HandlerAdapters
    initHandlerAdapters(context);
    // 初始化 HandlerExceptionResolvers
    initHandlerExceptionResolvers(context);
    // 初始化 RequestToViewNameTranslator
    initRequestToViewNameTranslator(context);
    // 初始化 ViewResolvers
    initViewResolvers(context);
    // 初始化 FlashMapManager
    initFlashMapManager(context);
}
2.3 DispatcherServlet
DispatcherServlet#initStrategies(ApplicationContext context) 方法,初始化 Spring MVC 的各种组件。代码如下:
// DispatcherServlet.java
/** MultipartResolver used by this servlet. */
@Nullable
private MultipartResolver multipartResolver;
/** LocaleResolver used by this servlet. */
@Nullable
private LocaleResolver localeResolver;
/** ThemeResolver used by this servlet. */
@Nullable
private ThemeResolver themeResolver;
/** List of HandlerMappings used by this servlet. */
@Nullable
private List<HandlerMapping> handlerMappings;
/** List of HandlerAdapters used by this servlet. */
@Nullable
private List<HandlerAdapter> handlerAdapters;
/** List of HandlerExceptionResolvers used by this servlet. */
@Nullable
private List<HandlerExceptionResolver> handlerExceptionResolvers;
/** RequestToViewNameTranslator used by this servlet. */
@Nullable
private RequestToViewNameTranslator viewNameTranslator;
/** FlashMapManager used by this servlet. */
@Nullable
private FlashMapManager flashMapManager;
/** List of ViewResolvers used by this servlet. */
@Nullable
private List<ViewResolver> viewResolvers;
/**
 * This implementation calls {@link #initStrategies}.
 */
@Override
protected void onRefresh(ApplicationContext context) {
    initStrategies(context);
}
/**
 * Initialize the strategy objects that this servlet uses.
 * <p>May be overridden in subclasses in order to initialize further strategy objects.
 */
protected void initStrategies(ApplicationContext context) {
    // 初始化 MultipartResolver
    initMultipartResolver(context);
    // 初始化 LocaleResolver
    initLocaleResolver(context);
    // 初始化 ThemeResolver
    initThemeResolver(context);
    // 初始化 HandlerMappings
    initHandlerMappings(context);
    // 初始化 HandlerAdapters
    initHandlerAdapters(context);
    // 初始化 HandlerExceptionResolvers
    initHandlerExceptionResolvers(context);
    // 初始化 RequestToViewNameTranslator
    initRequestToViewNameTranslator(context);
    // 初始化 ViewResolvers
    initViewResolvers(context);
    // 初始化 FlashMapManager
    initFlashMapManager(context);
}
一共有 9 个组件。下面,我们对这 9 个组件,做一个简单的介绍。
2.3.1 MultipartResolver
org.springframework.web.multipart.MultipartResolver,内容类型(Content-Type)为 multipart/* 的请求的解析器接口。
例如,文件上传请求,MultipartResolver 会将 HttpServletRequest 封装成 MultipartHttpServletRequest,这样从 MultipartHttpServletRequest 中获得上传的文件。
MultipartResolver 接口,代码如下:
// MultipartResolver.java
public interface MultipartResolver {
    /**
     * 是否为 multipart 请求
     */
    boolean isMultipart(HttpServletRequest request);
    /**
     * 将 HttpServletRequest 请求封装成 MultipartHttpServletRequest 对象
     */
    MultipartHttpServletRequest resolveMultipart(HttpServletRequest request) throws MultipartException;
    /**
     * 清理处理 multipart 产生的资源,例如临时文件
     *
     */
    void cleanupMultipart(MultipartHttpServletRequest request);
}
2.3.2 LocaleResolver
org.springframework.web.servlet.LocaleResolver,本地化(国际化)解析器接口。代码如下:
// LocaleResolver.java
public interface LocaleResolver {
    /**
     * 从请求中,解析出要使用的语言。例如,请求头的 "Accept-Language"
     */
    Locale resolveLocale(HttpServletRequest request);
    /**
     * 设置请求所使用的语言
     */
    void setLocale(HttpServletRequest request, @Nullable HttpServletResponse response, @Nullable Locale locale);
}
2.3.3 ThemeResolver
org.springframework.web.servlet.ThemeResolver,主题解析器接口。代码如下:
// ThemeResolver.java
public interface ThemeResolver {
    /**
     * 从请求中,解析出使用的主题。例如,从请求头 User-Agent,判断使用 PC 端,还是移动端的主题
     */
    String resolveThemeName(HttpServletRequest request);
    /**
     * 设置请求,所使用的主题。
     */
    void setThemeName(HttpServletRequest request, @Nullable HttpServletResponse response, @Nullable String themeName);
}
当然,因为现在的前端,基本和后端做了分离,所以这个功能已经越来越少用了。
2.3.4 HandlerMapping
org.springframework.web.servlet.HandlerMapping,处理器匹配接口,根据请求(handler)获得其的处理器(handler)和拦截器们(HandlerInterceptor 数组)。代码如下:
// HandlerMapping.java
public interface HandlerMapping {
    String PATH_WITHIN_HANDLER_MAPPING_ATTRIBUTE = HandlerMapping.class.getName() + ".pathWithinHandlerMapping";
    String BEST_MATCHING_PATTERN_ATTRIBUTE = HandlerMapping.class.getName() + ".bestMatchingPattern";
    String INTROSPECT_TYPE_LEVEL_MAPPING = HandlerMapping.class.getName() + ".introspectTypeLevelMapping";
    String URI_TEMPLATE_VARIABLES_ATTRIBUTE = HandlerMapping.class.getName() + ".uriTemplateVariables";
    String MATRIX_VARIABLES_ATTRIBUTE = HandlerMapping.class.getName() + ".matrixVariables";
    String PRODUCIBLE_MEDIA_TYPES_ATTRIBUTE = HandlerMapping.class.getName() + ".producibleMediaTypes";
    /**
     * 获得请求对应的处理器和拦截器们
     */
    @Nullable
    HandlerExecutionChain getHandler(HttpServletRequest request) throws Exception;
}
返回的对象类型是 HandlerExecutionChain,它包含处理器(handler)和拦截器们(HandlerInterceptor 数组)。简单代码如下:
// HandlerExecutionChain.java
/**
 * 处理器
 */
private final Object handler;
/**
 * 拦截器数组
 */
@Nullable
private HandlerInterceptor[] interceptors;
注意,处理器的类型可能和我们想的不太一样,是个 Object 类型。
2.3.5 HandlerAdapter
org.springframework.web.servlet.HandlerAdapter,处理器适配器接口。代码如下:
// HandlerAdapter.java
public interface HandlerAdapter {
    /**
     * 是否支持该处理器
     */
    boolean supports(Object handler);
    /**
     * 执行处理器,返回 ModelAndView 结果
     */
    @Nullable
    ModelAndView handle(HttpServletRequest request, HttpServletResponse response, Object handler) throws Exception;
    /**
     * 返回请求的最新更新时间。
     *
     * 如果不支持该操作,则返回 -1 即可
     */
    long getLastModified(HttpServletRequest request, Object handler);
}
因为,处理器 handler 的类型是 Object 类型,需要有一个调用者来实现 handler 是怎么被使用,怎么被执行。而 HandlerAdapter 的用途就在于此。可能如果接口名改成 HandlerInvoker,笔者觉得会更好理解。
三个接口,代码比较好理解,胖友瞅一眼,就不细讲了。
2.3.6 HandlerExceptionResolver
org.springframework.web.servlet.HandlerExceptionResolver,处理器异常解析器接口,将处理器(handler)执行时发生的异常,解析(转换)成对应的 ModelAndView 结果。代码如下:
// HandlerExceptionResolver.java
public interface HandlerExceptionResolver {
    /**
     * 解析异常,转换成对应的 ModelAndView 结果
     */
    @Nullable
    ModelAndView resolveException(
            HttpServletRequest request, HttpServletResponse response, @Nullable Object handler, Exception ex);
}
2.3.7 RequestToViewNameTranslator
org.springframework.web.servlet.RequestToViewNameTranslator,请求到视图名的转换器接口。代码如下:
// RequestToViewNameTranslator.java
public interface RequestToViewNameTranslator {
    /**
     * 根据请求,获得其视图名
     */
    @Nullable
    String getViewName(HttpServletRequest request) throws Exception;
}
粗略这么一看,有点不太好理解。捉摸了一下,还是放在后面一起讲解源码的时候,在详细讲解。
2.3.8 ViewResolver
org.springframework.web.servlet.ViewResolver,实体解析器接口,根据视图名和国际化,获得最终的视图 View 对象。代码如下:
// ViewResolver.java
public interface ViewResolver {
    /**
     * 根据视图名和国际化,获得最终的 View 对象
     */
    @Nullable
    View resolveViewName(String viewName, Locale locale) throws Exception;
}
ViewResolver 的实现类比较多,例如说,InternalResourceViewResolver 负责解析 JSP 视图,FreeMarkerViewResolver 负责解析 Freemarker 视图。当然,详细的,我们后续文章解析。
2.3.9 FlashMapManager
org.springframework.web.servlet.FlashMapManager,FlashMap 管理器接口,负责重定向时,保存参数到临时存储中。代码如下:
// FlashMapManager.java
public interface FlashMapManager {
    /**
     * 恢复参数,并将恢复过的和超时的参数从保存介质中删除
     */
    @Nullable
    FlashMap retrieveAndUpdate(HttpServletRequest request, HttpServletResponse response);
    /**
     * 将参数保存起来
     */
    void saveOutputFlashMap(FlashMap flashMap, HttpServletRequest request, HttpServletResponse response);
}
默认情况下,这个临时存储会是 Session。也就是说:
- 重定向前,保存参数到 Seesion 中。
- 重定向后,从 Session 中获得参数,并移除。
- 实际场景下,使用的非常少,特别是前后端分离之后。
三、MVC 是怎么处理 HTTP 分发请求的
一个用户的请求,是如何被 DispatcherServlet 处理的。如下图所示:
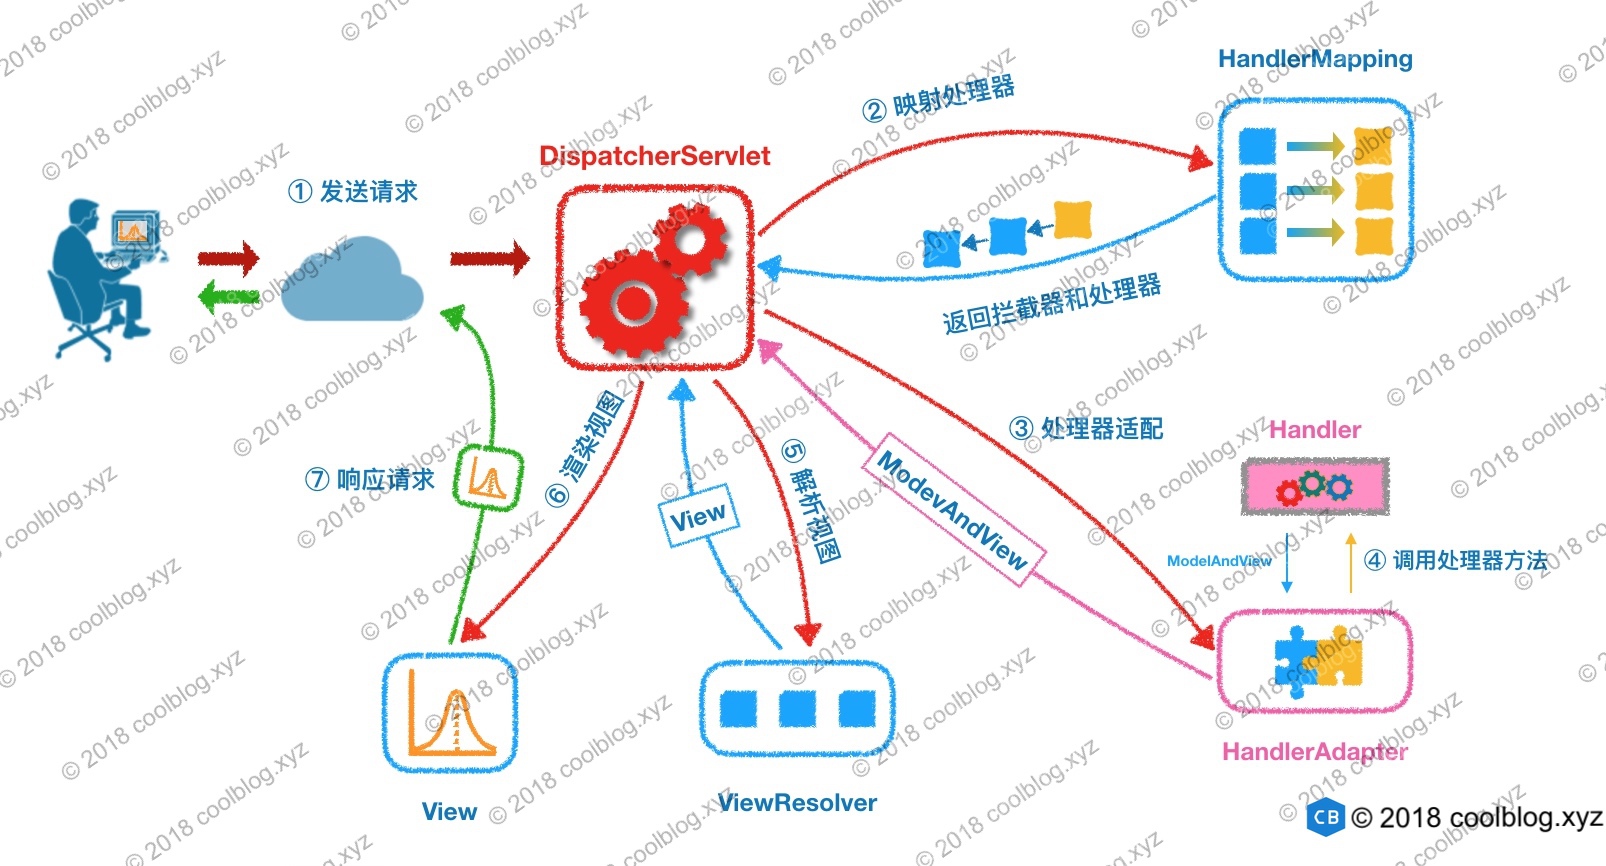
摘自《Spring MVC 原理探秘——一个请求的旅行过程》
整体流程实际不复杂,但是涉及的全部代码会非常多,所以下面重点在于解析整体的流程。
3.1 不同 HttpMethod 的请求处理
从整体流程图,我们看到请求首先是被 DispatcherServlet 所处理,但是实际上,FrameworkServlet 才是真正的入门。FrameworkServlet 会实现:
#doGet(HttpServletRequest request, HttpServletResponse response)
#doPost(HttpServletRequest request, HttpServletResponse response)
#doPut(HttpServletRequest request, HttpServletResponse response)
#doDelete(HttpServletRequest request, HttpServletResponse response)
#doOptions(HttpServletRequest request, HttpServletResponse response)
#doTrace(HttpServletRequest request, HttpServletResponse response)
#service(HttpServletRequest request, HttpServletResponse response)
等方法。而这些实现,最终会调用
#processRequest(HttpServletRequest request, HttpServletResponse response)方法,处理请求。FrameworkServlet#service(HttpServletRequest request, HttpServletResponse response)方法,代码如下:// FrameworkServlet.java @Override protected void service(HttpServletRequest request, HttpServletResponse response) throws ServletException, IOException { // <1> 获得请求方法 HttpMethod httpMethod = HttpMethod.resolve(request.getMethod()); // <2.1> 处理 PATCH 请求 if (httpMethod == HttpMethod.PATCH || httpMethod == null) { processRequest(request, response); // <2.2> 调用父类,处理其它请求 } else { super.service(request, response); } }<1> 处,获得请求方法。
<2.1> 处,若请求方法是 HttpMethod.PATCH,调用 #processRequest(HttpServletRequest request, HttpServletResponse response) 方法,处理请求。因为 HttpServlet 默认没提供 #doPatch(HttpServletRequest request, HttpServletResponse response) 方法,所以只能通过父类的 #service(...) 方法,从而实现。另外,关于 processRequest 的详细解析,见 「2.2 processRequest」。
<2.2> 处,其它类型的请求方法,还是调用父类的 HttpServlet#service(HttpServletRequest request, HttpServletResponse response) 方法,进行处理。代码如下:
// HttpServlet.java
protected void service(HttpServletRequest req, HttpServletResponse resp)
    throws ServletException, IOException {
    String method = req.getMethod();
    if (method.equals(METHOD_GET)) {
        long lastModified = getLastModified(req);
        if (lastModified == -1) {
            // servlet doesn't support if-modified-since, no reason
            // to go through further expensive logic
            doGet(req, resp);
        } else {
            long ifModifiedSince = req.getDateHeader(HEADER_IFMODSINCE);
            if (ifModifiedSince < lastModified) {
                // If the servlet mod time is later, call doGet()
                // Round down to the nearest second for a proper compare
                // A ifModifiedSince of -1 will always be less
                maybeSetLastModified(resp, lastModified);
                doGet(req, resp);
            } else {
                resp.setStatus(HttpServletResponse.SC_NOT_MODIFIED);
            }
        }
    } else if (method.equals(METHOD_HEAD)) {
        long lastModified = getLastModified(req);
        maybeSetLastModified(resp, lastModified);
        doHead(req, resp);
    } else if (method.equals(METHOD_POST)) {
        doPost(req, resp);
    } else if (method.equals(METHOD_PUT)) {
        doPut(req, resp);
    } else if (method.equals(METHOD_DELETE)) {
        doDelete(req, resp);
    } else if (method.equals(METHOD_OPTIONS)) {
        doOptions(req,resp);
    } else if (method.equals(METHOD_TRACE)) {
        doTrace(req,resp);
    } else {
        //
        // Note that this means NO servlet supports whatever
        // method was requested, anywhere on this server.
        //
        String errMsg = lStrings.getString("http.method_not_implemented");
        Object[] errArgs = new Object[1];
        errArgs[0] = method;
        errMsg = MessageFormat.format(errMsg, errArgs);
        resp.sendError(HttpServletResponse.SC_NOT_IMPLEMENTED, errMsg);
    }
}
可能会有胖友有疑惑,为什么不在
#service(HttpServletRequest request, HttpServletResponse response)方法,直接调用#processRequest(HttpServletRequest request, HttpServletResponse response)方法就好列?因为针对不同的请求方法,处理略微有所不同。3.2 针对 doGet & doPost & doPut & doDelete 请求方式的处理
这四个方法,都是直接调用
#processRequest(HttpServletRequest request, HttpServletResponse response)方法,处理请求。代码如下:// FrameworkServlet.java @Override protected final void doGet(HttpServletRequest request, HttpServletResponse response) throws ServletException, IOException { processRequest(request, response); } @Override protected final void doPost(HttpServletRequest request, HttpServletResponse response) throws ServletException, IOException { processRequest(request, response); } @Override protected final void doPut(HttpServletRequest request, HttpServletResponse response) throws ServletException, IOException { processRequest(request, response); } @Override protected final void doDelete(HttpServletRequest request, HttpServletResponse response) throws ServletException, IOException { processRequest(request, response); }3.3 针对 doOptions 请求的处理
// FrameworkServlet.java /** Should we dispatch an HTTP OPTIONS request to {@link #doService}?. */ private boolean dispatchOptionsRequest = false; /** * Delegate OPTIONS requests to {@link #processRequest}, if desired. * <p>Applies HttpServlet's standard OPTIONS processing otherwise, * and also if there is still no 'Allow' header set after dispatching. * @see #doService */ @Override protected void doOptions(HttpServletRequest request, HttpServletResponse response) throws ServletException, IOException { // 如果 dispatchOptionsRequest 为 true,则处理该请求 if (this.dispatchOptionsRequest || CorsUtils.isPreFlightRequest(request)) { // 处理请求 processRequest(request, response); // 如果响应 Header 包含 "Allow",则不需要交给父方法处理 if (response.containsHeader("Allow")) { // Proper OPTIONS response coming from a handler - we're done. return; } } // Use response wrapper in order to always add PATCH to the allowed methods // 调用父方法,并在响应 Header 的 "Allow" 增加 PATCH 的值 super.doOptions(request, new HttpServletResponseWrapper(response) { @Override public void setHeader(String name, String value) { if ("Allow".equals(name)) { value = (StringUtils.hasLength(value) ? value + ", " : "") + HttpMethod.PATCH.name(); } super.setHeader(name, value); } }); }OPTIONS 请求方法,实际场景下用的少。
3.4 针对 doTrace 请求的处理
// FrameworkServlet.java /** Should we dispatch an HTTP TRACE request to {@link #doService}?. */ private boolean dispatchTraceRequest = false; /** * Delegate TRACE requests to {@link #processRequest}, if desired. * <p>Applies HttpServlet's standard TRACE processing otherwise. * @see #doService */ @Override protected void doTrace(HttpServletRequest request, HttpServletResponse response) throws ServletException, IOException { // 如果 dispatchTraceRequest 为 true,则处理该请求 if (this.dispatchTraceRequest) { // 处理请求 processRequest(request, response); // 如果响应的内容类型为 "message/http",则不需要交给父方法处理 if ("message/http".equals(response.getContentType())) { // Proper TRACE response coming from a handler - we're done. return; } } // 调用父方法 super.doTrace(request, response); }TRACE 请求方法,实际场景下用的少。
3.5 处理请求
#processRequest(HttpServletRequest request, HttpServletResponse response)方法,处理请求。代码如下:// FrameworkServlet.java protected final void processRequest(HttpServletRequest request, HttpServletResponse response) throws ServletException, IOException { // <1> 记录当前时间,用于计算 web 请求的处理时间 long startTime = System.currentTimeMillis(); // <2> 记录异常 Throwable failureCause = null; LocaleContext previousLocaleContext = LocaleContextHolder.getLocaleContext(); LocaleContext localeContext = buildLocaleContext(request); RequestAttributes previousAttributes = RequestContextHolder.getRequestAttributes(); ServletRequestAttributes requestAttributes = buildRequestAttributes(request, response, previousAttributes); WebAsyncManager asyncManager = WebAsyncUtils.getAsyncManager(request); asyncManager.registerCallableInterceptor(FrameworkServlet.class.getName(), new RequestBindingInterceptor()); initContextHolders(request, localeContext, requestAttributes); try { // <3> 执行真正的逻辑 doService(request, response); } catch (ServletException | IOException ex) { failureCause = ex; // <8> throw ex; } catch (Throwable ex) { failureCause = ex; // <8> throw new NestedServletException("Request processing failed", ex); } finally { resetContextHolders(request, previousLocaleContext, previousAttributes); if (requestAttributes != null) { requestAttributes.requestCompleted(); } // <4> 打印请求日志,并且日志级别为 DEBUG logResult(request, response, failureCause, asyncManager); // <5> 发布 ServletRequestHandledEvent 事件 publishRequestHandledEvent(request, response, startTime, failureCause); } }3.6 DispatcherServlet 处理请求
#doService(HttpServletRequest request, HttpServletResponse response)方法,DispatcherServlet 的处理请求的入口方法,代码如下:// DispatcherServlet.java @Override protected void doService(HttpServletRequest request, HttpServletResponse response) throws Exception { // <1> 打印请求日志,并且日志级别为 DEBUG logRequest(request); // Keep a snapshot of the request attributes in case of an include, // to be able to restore the original attributes after the include. Map<String, Object> attributesSnapshot = null; if (WebUtils.isIncludeRequest(request)) { attributesSnapshot = new HashMap<>(); Enumeration<?> attrNames = request.getAttributeNames(); while (attrNames.hasMoreElements()) { String attrName = (String) attrNames.nextElement(); if (this.cleanupAfterInclude || attrName.startsWith(DEFAULT_STRATEGIES_PREFIX)) { attributesSnapshot.put(attrName, request.getAttribute(attrName)); } } } // Make framework objects available to handlers and view objects. // <2> 设置 Spring 框架中的常用对象到 request 属性中 request.setAttribute(WEB_APPLICATION_CONTEXT_ATTRIBUTE, getWebApplicationContext()); request.setAttribute(LOCALE_RESOLVER_ATTRIBUTE, this.localeResolver); request.setAttribute(THEME_RESOLVER_ATTRIBUTE, this.themeResolver); request.setAttribute(THEME_SOURCE_ATTRIBUTE, getThemeSource()); // <3> flashMapManager if (this.flashMapManager != null) { FlashMap inputFlashMap = this.flashMapManager.retrieveAndUpdate(request, response); if (inputFlashMap != null) { request.setAttribute(INPUT_FLASH_MAP_ATTRIBUTE, Collections.unmodifiableMap(inputFlashMap)); } request.setAttribute(OUTPUT_FLASH_MAP_ATTRIBUTE, new FlashMap()); request.setAttribute(FLASH_MAP_MANAGER_ATTRIBUTE, this.flashMapManager); } try { // <4> 执行请求的分发 doDispatch(request, response); } finally { if (!WebAsyncUtils.getAsyncManager(request).isConcurrentHandlingStarted()) { // Restore the original attribute snapshot, in case of an include. if (attributesSnapshot != null) { restoreAttributesAfterInclude(request, attributesSnapshot); } } } }3.7 请求的分发
跟进到 DispatcherServlet#doDispatch() 方法,执行请求的分发。代码如下:
// DispatcherServlet.java
protected void doDispatch(HttpServletRequest request, HttpServletResponse response) throws Exception {
    HttpServletRequest processedRequest = request;
    HandlerExecutionChain mappedHandler = null;
    boolean multipartRequestParsed = false;
    <1> TODO
    WebAsyncManager asyncManager = WebAsyncUtils.getAsyncManager(request);
    try {
        ModelAndView mv = null;
        Exception dispatchException = null;
        try {
            <2> 检查是否是上传请求。如果是,则封装成 MultipartHttpServletRequest 对象。
            processedRequest = checkMultipart(request);
            multipartRequestParsed = (processedRequest != request);
            // Determine handler for the current request.
            // <3> 获得请求对应的 HandlerExecutionChain 对象
            mappedHandler = getHandler(processedRequest);
            if (mappedHandler == null) { // <3.1> 如果获取不到,则根据配置抛出异常或返回 404 错误
                noHandlerFound(processedRequest, response);
                return;
            }
            // Determine handler adapter for the current request.
            // <4> 获得当前 handler 对应的 HandlerAdapter 对象
            HandlerAdapter ha = getHandlerAdapter(mappedHandler.getHandler());
            // Process last-modified header, if supported by the handler.
            // <4.1>  last-modified
            String method = request.getMethod();
            boolean isGet = "GET".equals(method);
            if (isGet || "HEAD".equals(method)) {
                long lastModified = ha.getLastModified(request, mappedHandler.getHandler());
                if (new ServletWebRequest(request, response).checkNotModified(lastModified) && isGet) {
                    return;
                }
            }
            // <5> 前置处理 拦截器
            if (!mappedHandler.applyPreHandle(processedRequest, response)) {
                return;
            }
            // Actually invoke the handler.
            // <6> 真正的调用 handler 方法,并返回视图
            mv = ha.handle(processedRequest, response, mappedHandler.getHandler());
            // <7> TODO
            if (asyncManager.isConcurrentHandlingStarted()) {
                return;
            }
            // <8> 视图
            applyDefaultViewName(processedRequest, mv);
            // <9> 后置处理 拦截器
            mappedHandler.applyPostHandle(processedRequest, response, mv);
        } catch (Exception ex) {
            dispatchException = ex; // <10> 记录异常
        } catch (Throwable err) {
            // As of 4.3, we're processing Errors thrown from handler methods as well,
            // making them available for @ExceptionHandler methods and other scenarios.
            dispatchException = new NestedServletException("Handler dispatch failed", err); // <10> 记录异常
        }
        // <11> 处理正常和异常的请求调用结果。
        processDispatchResult(processedRequest, response, mappedHandler, mv, dispatchException);
    } catch (Exception ex) {
        // <12> 已完成 拦截器
        triggerAfterCompletion(processedRequest, response, mappedHandler, ex);
    } catch (Throwable err) {
        // <12> 已完成 拦截器
        triggerAfterCompletion(processedRequest, response, mappedHandler,
                new NestedServletException("Handler processing failed", err));
    } finally {
        if (asyncManager.isConcurrentHandlingStarted()) {
            // Instead of postHandle and afterCompletion
            if (mappedHandler != null) {
                mappedHandler.applyAfterConcurrentHandlingStarted(processedRequest, response);
            }
        } else {
            // <13> Clean up any resources used by a multipart request.
            if (multipartRequestParsed) {
                cleanupMultipart(processedRequest);
            }
        }
    }
}
<2> 处,调用
#checkMultipart(HttpServletRequest request)方法,检查是否是上传请求。如果是,则封装成 MultipartHttpServletRequest 对象。<3> 处,调用
#getHandler(HttpServletRequest request)方法,返回请求对应的是 HandlerExecutionChain 对象,它包含处理器(handler)和拦截器们(HandlerInterceptor 数组)。代码如下:// DispatcherServlet.java /** List of HandlerMappings used by this servlet. */ @Nullable private List<HandlerMapping> handlerMappings; @Nullable protected HandlerExecutionChain getHandler(HttpServletRequest request) throws Exception { if (this.handlerMappings != null) { // 遍历 HandlerMapping 数组 for (HandlerMapping mapping : this.handlerMappings) { // 获得请求对应的 HandlerExecutionChain 对象 HandlerExecutionChain handler = mapping.getHandler(request); // 获得到,则返回 if (handler != null) { return handler; } } } return null; }<3.1> 处,如果获取不到,则调用
#noHandlerFound(HttpServletRequest
                                        request, HttpServletResponse response)
根据配置抛出异常或返回 404 错误。<4> 处,调用
#getHandlerAdapter(Object handler)方法,获得当前 handler 对应的 HandlerAdapter 对象。代码如下:// DispatcherServlet.java /** List of HandlerAdapters used by this servlet. */ @Nullable private List<HandlerAdapter> handlerAdapters; protected HandlerAdapter getHandlerAdapter(Object handler) throws ServletException { if (this.handlerAdapters != null) { // 遍历 HandlerAdapter 数组 for (HandlerAdapter adapter : this.handlerAdapters) { // 判断是否支持当前处理器 if (adapter.supports(handler)) { // 如果支持,则返回 return adapter; } } } // 没找到对应的 HandlerAdapter 对象,抛出 ServletException 异常 throw new ServletException("No adapter for handler [" + handler + "]: The DispatcherServlet configuration needs to include a HandlerAdapter that supports this handler"); }【前置拦截器】<5> 处,调用
HandlerExecutionChain#applyPreHandle(HttpServletRequest request, HttpServletResponse response)方法,拦截器的前置处理,即调用HandlerInterceptor#preHandle(HttpServletRequest request, HttpServletResponse response, Object handler)方法。【Controller】<6> 处,调用
HandlerAdapter#handle(HttpServletRequest
                                        request, HttpServletResponse response, Object handler)
方法,真正的调用 handler 方法,并返回视图。这里,一般就会调用我们定义的 Controller 的方法。<8> 处,调用
#applyDefaultViewName(HttpServletRequest request, ModelAndView mv)方法,当无视图的情况下,设置默认视图。代码如下:// DispatcherServlet.java /** RequestToViewNameTranslator used by this servlet. */ @Nullable private RequestToViewNameTranslator viewNameTranslator; private void applyDefaultViewName(HttpServletRequest request, @Nullable ModelAndView mv) throws Exception { if (mv != null && !mv.hasView()) { // 无视图 // 获得默认视图 String defaultViewName = getDefaultViewName(request); // 设置默认视图 if (defaultViewName != null) { mv.setViewName(defaultViewName); } } } @Nullable protected String getDefaultViewName(HttpServletRequest request) throws Exception { // 从请求中,获得视图 return (this.viewNameTranslator != null ? this.viewNameTranslator.getViewName(request) : null); }【后置拦截器】<9> 处,调用
HandlerExecutionChain#applyPostHandle(HttpServletRequest request, HttpServletResponse response, ModelAndView mv)`` 方法,拦截器的后置处理,即调用 HandlerInterceptor#postHandle(HttpServletRequest request, HttpServletResponse response, Object handler)方法。<10> 处,记录异常。注意,此处仅仅记录,不会抛出异常,而是统一交给 <11> 处理。
<11> 处,调用
#processDispatchResult(HttpServletRequest request, HttpServletResponse response, HandlerExecutionChain mappedHandler, ModelAndView mv, Exception exception)方法,处理正常和异常的请求调用结果。注意,正常的、异常的,都会进行处理。【已完成拦截器】<12> 处,调用
#triggerAfterCompletion(HttpServletRequest request, HttpServletResponse response, HandlerExecutionChain mappedHandler, Exception ex)方法,拦截器的已完成处理,即调用HandlerInterceptor#triggerAfterCompletion(HttpServletRequest request, HttpServletResponse response, Exception ex)方法。<13> 处,如果是上传请求,则调用
#cleanupMultipart(HttpServletRequest request)方法,清理资源。四、MVC 视图的呈现
4.1 处理请求响应的结果数据
DispatcherServlet#processDispatchResult(HttpServletRequest request, HttpServletResponse response, HandlerExecutionChain mappedHandler, ModelAndView mv, Exception exception)方法,处理正常和异常的请求调用结果。代码如下:
// DispatcherServlet.java
private void processDispatchResult(HttpServletRequest request, HttpServletResponse response,
        @Nullable HandlerExecutionChain mappedHandler, @Nullable ModelAndView mv,
        @Nullable Exception exception) throws Exception {
    // <1> 标记,是否是生成的 ModelAndView 对象
    boolean errorView = false;
    // <2> 如果是否异常的结果
    if (exception != null) {
        // 情况一,从 ModelAndViewDefiningException 中获得 ModelAndView 对象
        if (exception instanceof ModelAndViewDefiningException) {
            logger.debug("ModelAndViewDefiningException encountered", exception);
            mv = ((ModelAndViewDefiningException) exception).getModelAndView();
        // 情况二,处理异常,生成 ModelAndView 对象
        } else {
            Object handler = (mappedHandler != null ? mappedHandler.getHandler() : null);
            mv = processHandlerException(request, response, handler, exception);
            // 标记 errorView
            errorView = (mv != null);
        }
    }
    // Did the handler return a view to render?
    if (mv != null && !mv.wasCleared()) {
        // <3.1> 渲染页面
        render(mv, request, response);
        // <3.2> 清理请求中的错误消息属性
        if (errorView) {
            WebUtils.clearErrorRequestAttributes(request);
        }
    } else {
        if (logger.isTraceEnabled()) {
            logger.trace("No view rendering, null ModelAndView returned.");
        }
    }
    // <4> TODO
    if (WebAsyncUtils.getAsyncManager(request).isConcurrentHandlingStarted()) {
        // Concurrent handling started during a forward
        return;
    }
    // <5> 已完成处理 拦截器
    if (mappedHandler != null) {
        mappedHandler.triggerAfterCompletion(request, response, null);
    }
}
<1> 处,errorView 属性,标记是否是生成的 ModelAndView 对象。
<2> 处,如果是否异常的结果。
<2.1> 处,情况一,从 ModelAndViewDefiningException 中获得 ModelAndView 对象。
<2.2> 处,情况二,调用
#processHandlerException(HttpServletRequest
                                        request, HttpServletResponse response, Object handler, Exception ex)
方法,处理异常,生成 ModelAndView 对象。代码如下:// DispatcherServlet.java @Nullable protected ModelAndView processHandlerException(HttpServletRequest request, HttpServletResponse response, @Nullable Object handler, Exception ex) throws Exception { // Success and error responses may use different content types // 移除 PRODUCIBLE_MEDIA_TYPES_ATTRIBUTE 属性 request.removeAttribute(HandlerMapping.PRODUCIBLE_MEDIA_TYPES_ATTRIBUTE); // Check registered HandlerExceptionResolvers... // <a> 遍历 HandlerExceptionResolver 数组,解析异常,生成 ModelAndView 对象 ModelAndView exMv = null; if (this.handlerExceptionResolvers != null) { // 遍历 HandlerExceptionResolver 数组 for (HandlerExceptionResolver resolver : this.handlerExceptionResolvers) { // 解析异常,生成 ModelAndView 对象 exMv = resolver.resolveException(request, response, handler, ex); // 生成成功,结束循环 if (exMv != null) { break; } } } // 情况一,生成了 ModelAndView 对象,进行返回 if (exMv != null) { // ModelAndView 对象为空,则返回 null if (exMv.isEmpty()) { request.setAttribute(EXCEPTION_ATTRIBUTE, ex); // 记录异常到 request 中 return null; } // We might still need view name translation for a plain error model... // 设置默认视图 if (!exMv.hasView()) { String defaultViewName = getDefaultViewName(request); if (defaultViewName != null) { exMv.setViewName(defaultViewName); } } // 打印日志 if (logger.isTraceEnabled()) { logger.trace("Using resolved error view: " + exMv, ex); } if (logger.isDebugEnabled()) { logger.debug("Using resolved error view: " + exMv); } // 设置请求中的错误消息属性 WebUtils.exposeErrorRequestAttributes(request, ex, getServletName()); return exMv; } // 情况二,未生成 ModelAndView 对象,则抛出异常 throw ex; }处,情况一,生成了 ModelAndView 对象,进行返回。当然,这里的后续代码还有 10 多行,比较简单,胖友自己瞅瞅就 OK 啦。
处,情况二,未生成 ModelAndView 对象,则抛出异常。 <3.1> 处,调用
#render(ModelAndView mv, HttpServletRequest request, HttpServletResponse response)方法,渲染页面。<3.2> 处,当是 <2> 处的情况二时,则调用
WebUtils#clearErrorRequestAttributes(HttpServletRequest request)方法,清理请求中的错误消息属性。为什么会有这一步呢?答案在#processHandlerException(HttpServletRequest request, HttpServletResponse response, Object handler, Exception ex)方法中,会调用WebUtils#exposeErrorRequestAttributes(HttpServletRequest request, Throwable ex, String servletName)方法,设置请求中的错误消息属性。<4> 处,TODO 【拦截器】<5> 处,调用
#triggerAfterCompletion(HttpServletRequest request, HttpServletResponse response, HandlerExecutionChain mappedHandler, Exception ex)方法,拦截器的已完成处理,即调用HandlerInterceptor#triggerAfterCompletion(HttpServletRequest request, HttpServletResponse response, Exception ex)方法。4.2 渲染页面
跟进到
DispatcherServlet#render(ModelAndView mv, HttpServletRequest
                                        request, HttpServletResponse response)
方法,渲染 ModelAndView。代码如下:// DispatcherServlet.java protected void render(ModelAndView mv, HttpServletRequest request, HttpServletResponse response) throws Exception { // Determine locale for request and apply it to the response. // <1> TODO 从 request 中获得 Locale 对象,并设置到 response 中 Locale locale = (this.localeResolver != null ? this.localeResolver.resolveLocale(request) : request.getLocale()); response.setLocale(locale); // 获得 View 对象 View view; String viewName = mv.getViewName(); // 情况一,使用 viewName 获得 View 对象 if (viewName != null) { // We need to resolve the view name. // <2.1> 使用 viewName 获得 View 对象 view = resolveViewName(viewName, mv.getModelInternal(), locale, request); if (view == null) { // 获取不到,抛出 ServletException 异常 throw new ServletException("Could not resolve view with name '" + mv.getViewName() + "' in servlet with name '" + getServletName() + "'"); } // 情况二,直接使用 ModelAndView 对象的 View 对象 } else { // No need to lookup: the ModelAndView object contains the actual View object. // 直接使用 ModelAndView 对象的 View 对象 view = mv.getView(); if (view == null) { // 获取不到,抛出 ServletException 异常 throw new ServletException("ModelAndView [" + mv + "] neither contains a view name nor a " + "View object in servlet with name '" + getServletName() + "'"); } } // Delegate to the View object for rendering. // 打印日志 if (logger.isTraceEnabled()) { logger.trace("Rendering view [" + view + "] "); } try { // <3> 设置响应的状态码 if (mv.getStatus() != null) { response.setStatus(mv.getStatus().value()); } // <4> 渲染页面 view.render(mv.getModelInternal(), request, response); } catch (Exception ex) { if (logger.isDebugEnabled()) { logger.debug("Error rendering view [" + view + "]", ex); } throw ex; } }<1> 处,调用
LocaleResolver#resolveLocale(HttpServletRequest
                                        request)
方法,从 request 中获得 Locale 对象,并设置到 response 中。<2> 处,获得 View 对象。分成两种情况,代码比较简单,胖友自己瞅瞅。
<2.1> 处,调用
#resolveViewName(String viewName, Map<String, Object>
                                        model, Locale locale, HttpServletRequest request)
方法,使用 viewName 获得 View 对象。代码如下:// DispatcherServlet.java @Nullable protected View resolveViewName(String viewName, @Nullable Map<String, Object> model, Locale locale, HttpServletRequest request) throws Exception { if (this.viewResolvers != null) { // 遍历 ViewResolver 数组 for (ViewResolver viewResolver : this.viewResolvers) { // 根据 viewName + locale 参数,解析出 View 对象 View view = viewResolver.resolveViewName(viewName, locale); // 解析成功,直接返回 View 对象 if (view != null) { return view; } } } // 返回空 return null; }<3> 处,设置响应的状态码。
<4> 处,调用
View#render(Map<String, ?> model, HttpServletRequest request, HttpServletResponse response)方法,渲染视图。总结
Spring MVC 的初始化及请求分发处理请求的流程总结:
- ContextLoaderListener 监听 Servlet 容器(tomcat、jetty、jboss 等)的启动事件,调用
ContextLoaderListener #contextInitialized(ServletContextEvent
                                                event)
方法,初始化 Root WebApplicationContext 容器。 - HttpServletBean 将 ServletConfig 设置到当前 Servlet 对象中,解析 Servlet 配置的
标签,封装到 PropertyValues 中。 - FrameworkServlet#initServletBean() 方法,进一步初始化当前 Servlet 对象。调用 #initWebApplicationContext() 方法,初始化 Servlet WebApplicationContext 对象,设置父容器为 Root WebApplicationContext 容器。
- DispatcherServlet#initStrategies() 方法,初始化 MultipartResolver、LocaleResolver、ThemeResolver、HandlerMappings、HandlerAdapters、HandlerExceptionResolvers 、RequestToViewNameTranslator、ViewResolvers、FlashMapManager 组件。
- FrameworkServlet 处理 POST、GET、PUT、DELETE、OPTIONS、TRANCE 类型的 HTTP 请求。
- DispatcherServlet 执行请求的分发,根据请求获得请求对应的 HandlerExecutionChain 对象,对请求 handle 进行适配获得 HandlerAdapter 对象,执行前置处理器,执行 controller 中的 handle() 方法并返回视图,生成 ModelAndView 视图,执行后置处理器。
- DispatcherServlet#processDispatchResult() 方法处理请求响应结果并渲染页面。(封装 response、响应状态码、渲染视图)